The full shot cycle, explained step-by-step — stance, grip, draw, anchor, aim, release, and follow-through — with data, drills, and pro technique from Levi Morgan and Nock On Archery.
Essential Gear & Setup
Before you pull back a single string, make sure your equipment is dialed in. Wrong gear = bad habits that take months to fix.
// Beginner Setup Numbers — Know These Before You Start

| Equipment | What to Look For | Beginner Pick | Priority |
|---|---|---|---|
| Compound Bow | Adjustable draw length & weight, forgiving brace height (7″+) | Bear Archery Cruzer G2, Diamond Infinite Edge | Essential |
| Arrows | Spine matched to draw weight. Gold Tip Hunter XT or Easton Axis for beginners | Gold Tip Warrior 340–400 spine | Essential |
| Release Aid | Index finger (trigger) release for beginners. Caliper jaws clip onto D-loop | Carter Evolution, TruFire Hurricane | Essential |
| Bow Sight | Single-pin or 3–5 pin. Fixed pins for beginners. Easy to adjust. | CBE Tactic, Trophy Ridge React Pro | Essential |
| Peep Sight | Installed into bowstring. Aligns your eye with the sight. 1/8″ aperture common | G5 Meta Pro Peep | Essential |
| Arrow Rest | Whisker Biscuit for beginners (forgiving). Drop-away for accuracy later | Trophy Ridge Whisker Biscuit | Essential |
| D-Loop | Tied below nocking point. Protects string, connects release. Get it properly tied | BCY D-Loop material (have pro tie it) | Essential |
| Stabilizer | Reduces vibration, balances bow. Even a 5″ short stabilizer helps significantly | Bee Stinger Sport Hunter | Recommended |
| Arm Guard | Protects forearm from string slap. Essential while learning form | Any fitted leather or neoprene guard | Recommended |
| Hinge/Back-Tension Release | Eliminates trigger panic. Learn after 6+ months of command-style shooting | Carter Chocolate Milk, Stan Perfex | Advanced |
“As a beginner, you might want to start with a lower poundage bow to build your strength and accuracy. Arrows that match the right length and weight for your bow are just as critical as the bow itself.”
— Nock On Archery, Archery 101 GuideCompound Bow Anatomy
Know every part before you shoot. Understanding what each component does makes troubleshooting and improvement 10x faster.
Compound Bow — Labeled Diagram
hover labels for infoThe Shot Cycle: 8 Steps
Every accurate shot follows the same 8-step process. Master each one before chasing distance or speed.
01 — Stance & Positioning
Your stance is the foundation of every shot. Get this wrong and nothing else can save your groups.
- Stand at 45° to the target (open stance) — NOT 90°. Most beginners get this wrong.
- Feet shoulder-width apart, weight distributed evenly on both feet.
- Slight forward lean from the hips — think “athletic ready position.”
- Shoulders relaxed and down — never hunched or raised.
- Head straight, chin level. Don’t tilt or crane your neck toward the sight.

02 — Bow Grip
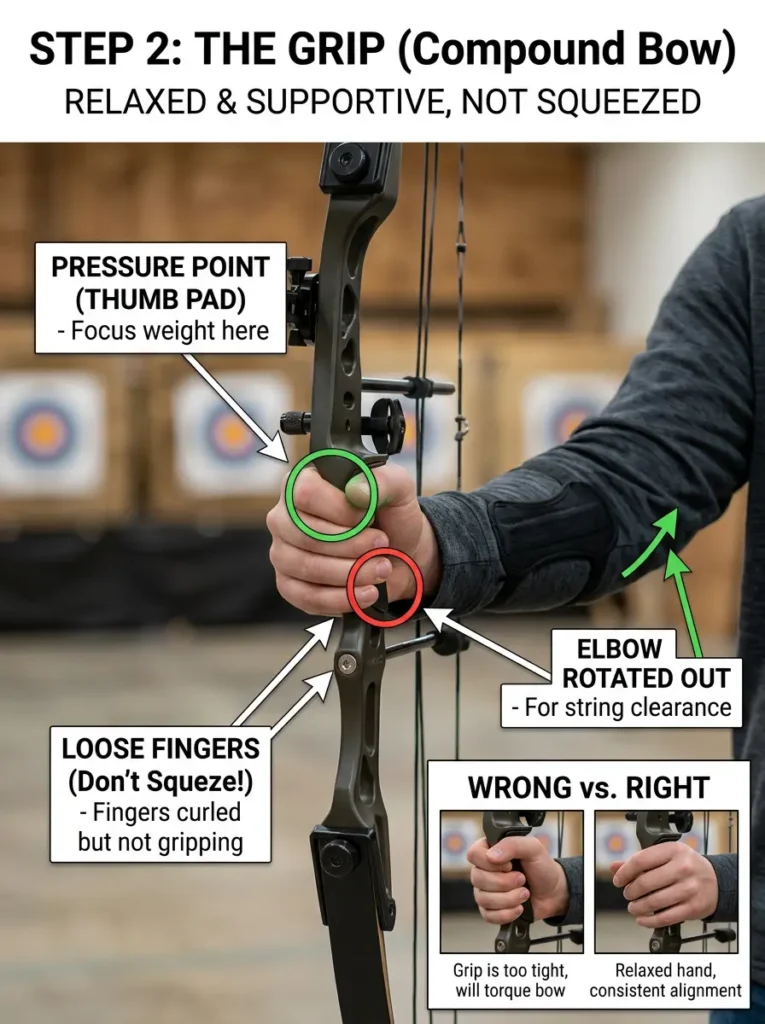
A death-grip kills accuracy. The bow handle sits in the “V” between thumb and index finger, on the meaty pad of your thumb.
- Pressure on the thumb pad (thenar eminence), NOT in the palm center.
- Fingers relaxed and curled — never squeezing or gripping.
- Thumb points naturally toward the target at ~45° angle.
- Bow arm elbow slightly rotated out — prevents string slap.
- Use a wrist sling so you can fully relax the grip without dropping the bow.
03 — Nocking the Arrow
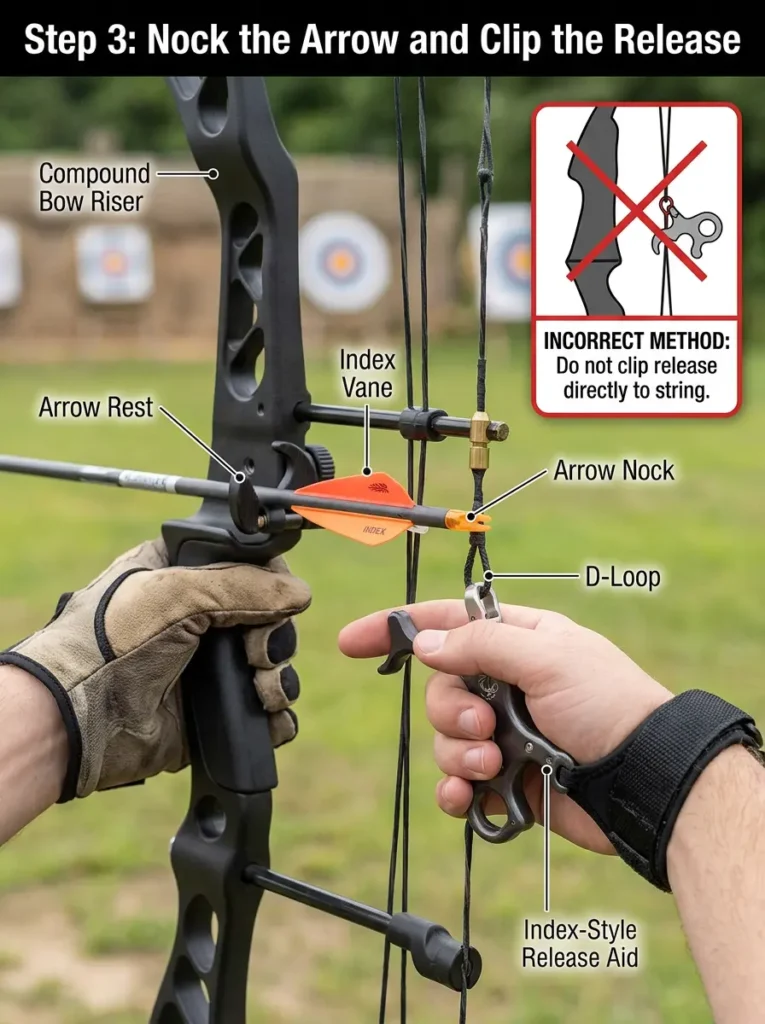
The arrow nock clips onto the bowstring below the D-loop. Index (cock) vane faces away from the riser.
- Index (cock) vane points away from the riser (outward).
- Clip the release aid onto the D-loop — not directly on the string.
- Arrow seated fully on the arrow rest before drawing.
- Feel the nock “click” onto the string — it should be snug but not forced.
04 — The Draw
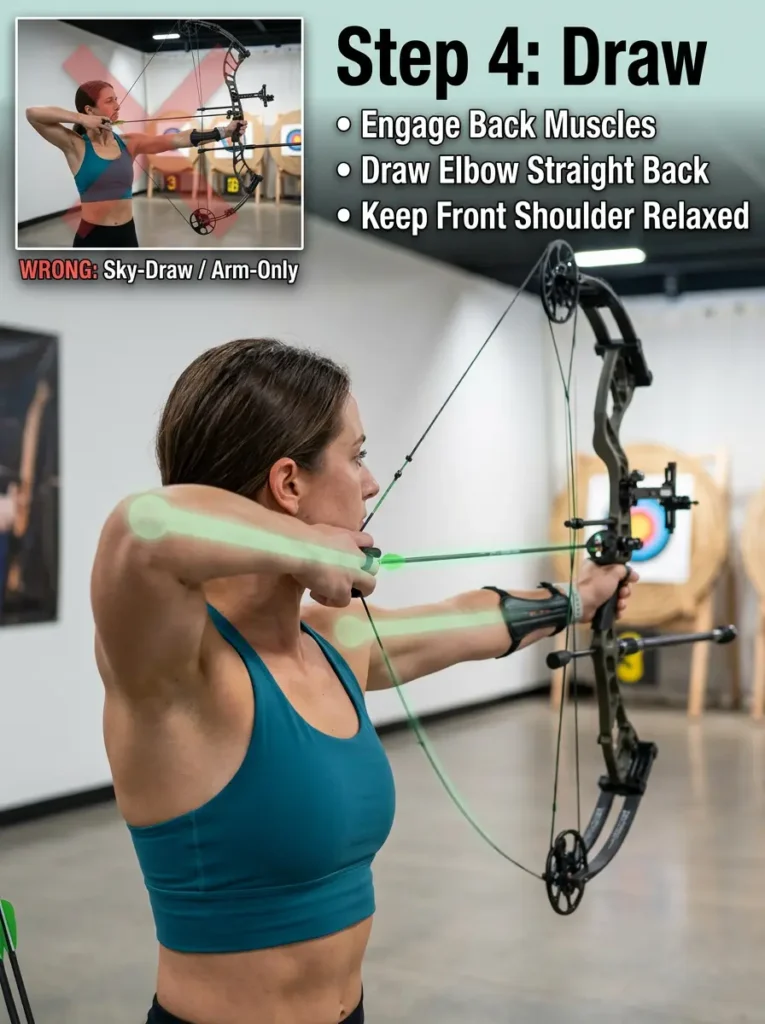
Draw with your BACK, not your arm. Most beginners muscle it with the bicep — that creates inconsistency and fatigue.
- Raise both arms toward the target simultaneously in one fluid motion.
- Initiate the draw by rotating the shoulder blade of your draw arm back and inward.
- Draw elbow should travel straight back — not flaring up or dropping.
- “Think of pulling a barn door closed behind you — not starting a lawnmower.” (Nock On Archery)
- Keep your front shoulder DOWN and relaxed throughout the draw.
05 — Anchor Point
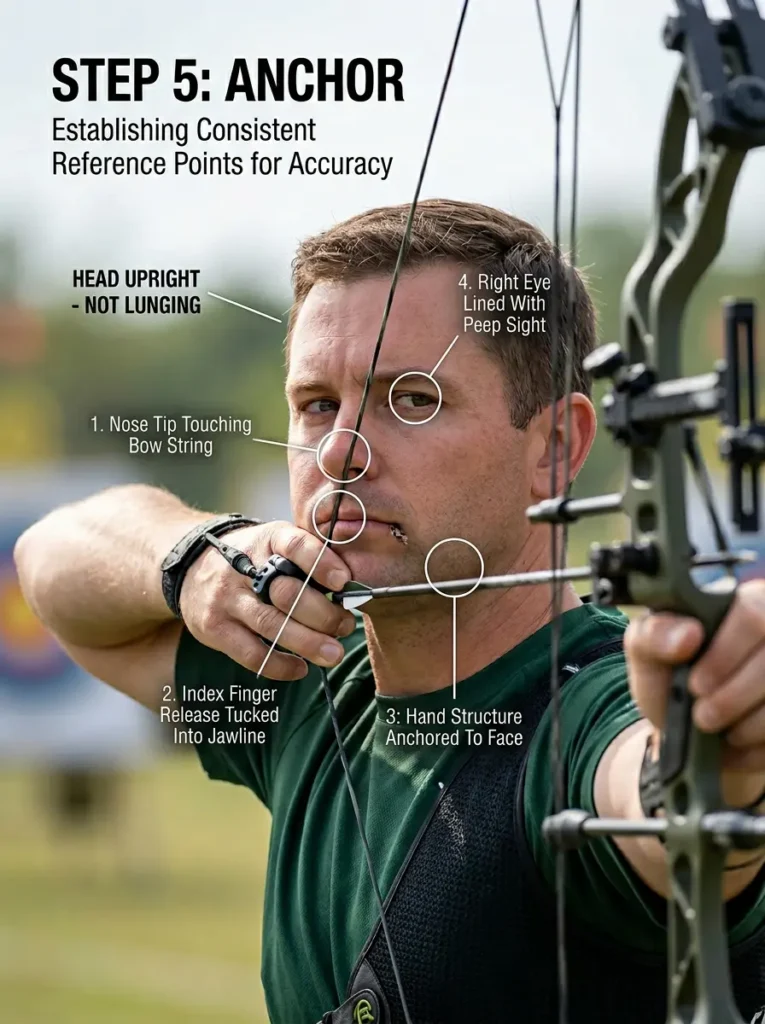
Your anchor is home base. It must be identical on every single shot or your groups will wander unpredictably.
- String touches the tip of your nose (string-to-nose contact).
- String touches the corner of your lips or chin (string-to-mouth contact).
- Release hand is firmly against your jaw/cheekbone.
- Peep sight is centered in your eye — you see the sight circle clearly.
- Back muscles are loaded — this is “at full draw,” not just arms pulled back.
06 — Aiming
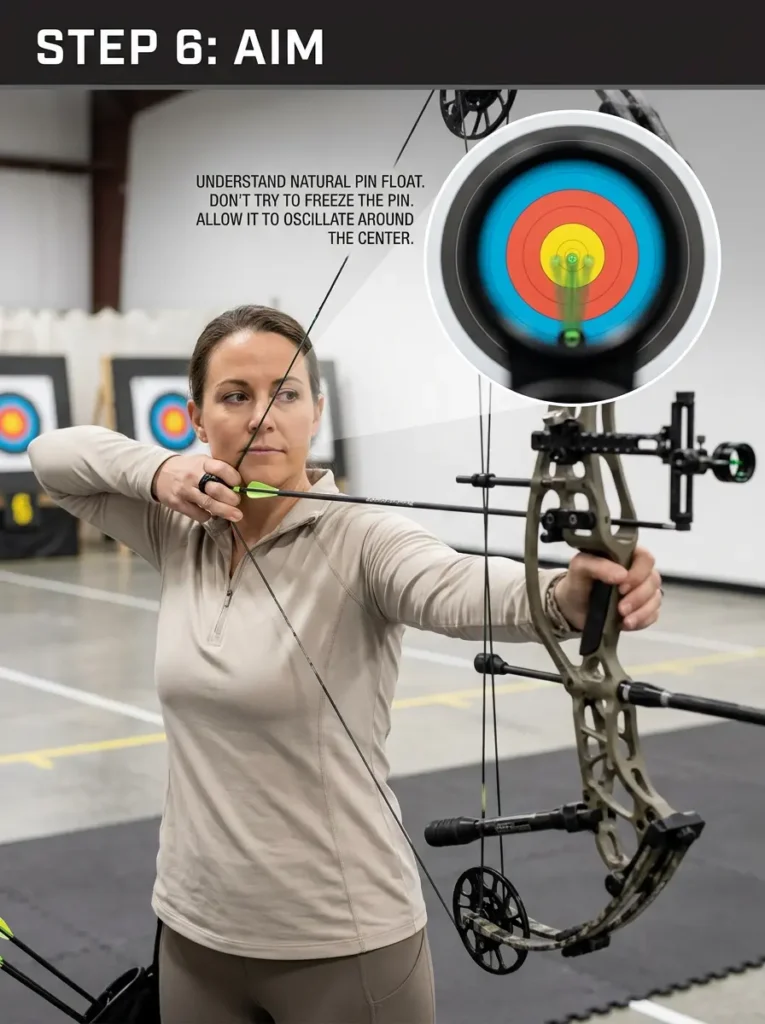
Pin on target. But pro tip: don’t try to hold it perfectly still — it won’t work. The secret is focus, not stillness.
- Look THROUGH the peep sight at the sight pin — both aligned with the target.
- Focus on the CENTER of the target, not on the pin itself.
- Let the pin float over the center — don’t freeze it. Levi Morgan: “It’s amazing how much pin movement you can get away with just by thinking about the middle.”
- Take a controlled breath, exhale halfway, then hold while you execute.
- Don’t hold at full draw longer than 8–10 seconds — accuracy decays fast.
07 — Shot Release
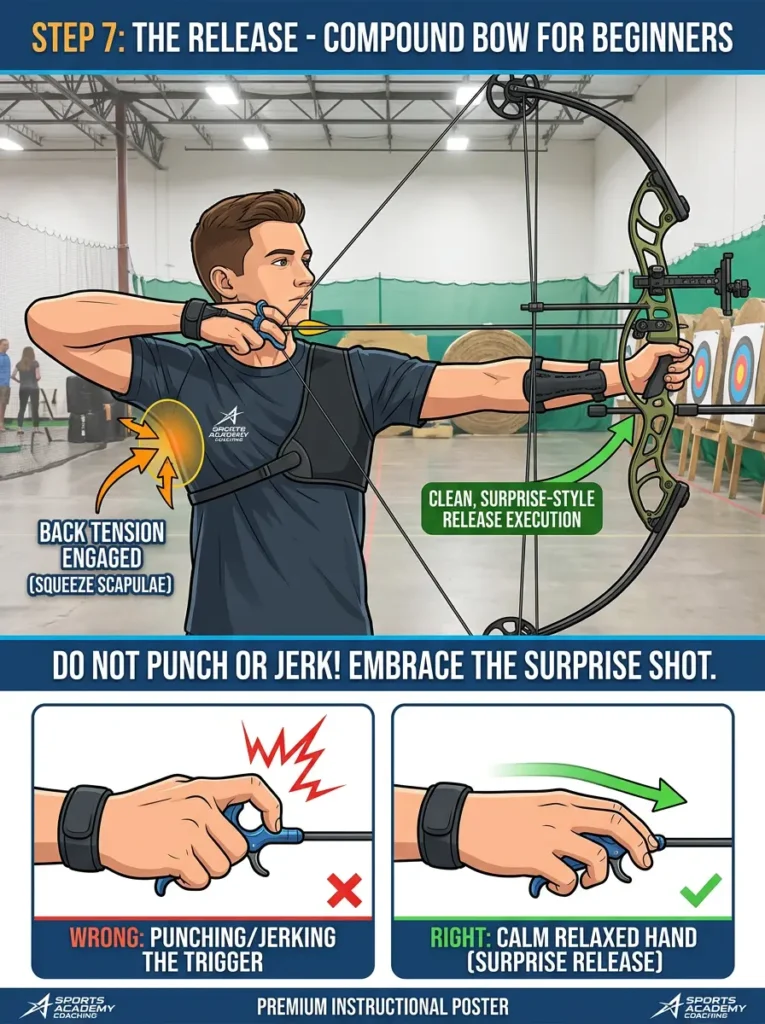
The release makes or breaks the shot. Two methods: command (trigger punch) and back tension (surprise release). Both work — choose intentionally.
- Command style: conscious trigger pull when sight picture looks right.
- Back tension/surprise: continue loading back muscles until the release trips unexpectedly.
- Either way — the trigger fires while maintaining continuous back tension.
- Do NOT anticipate the shot by flinching forward or dropping the bow arm.
- Your release hand should naturally pull back past your ear on firing.
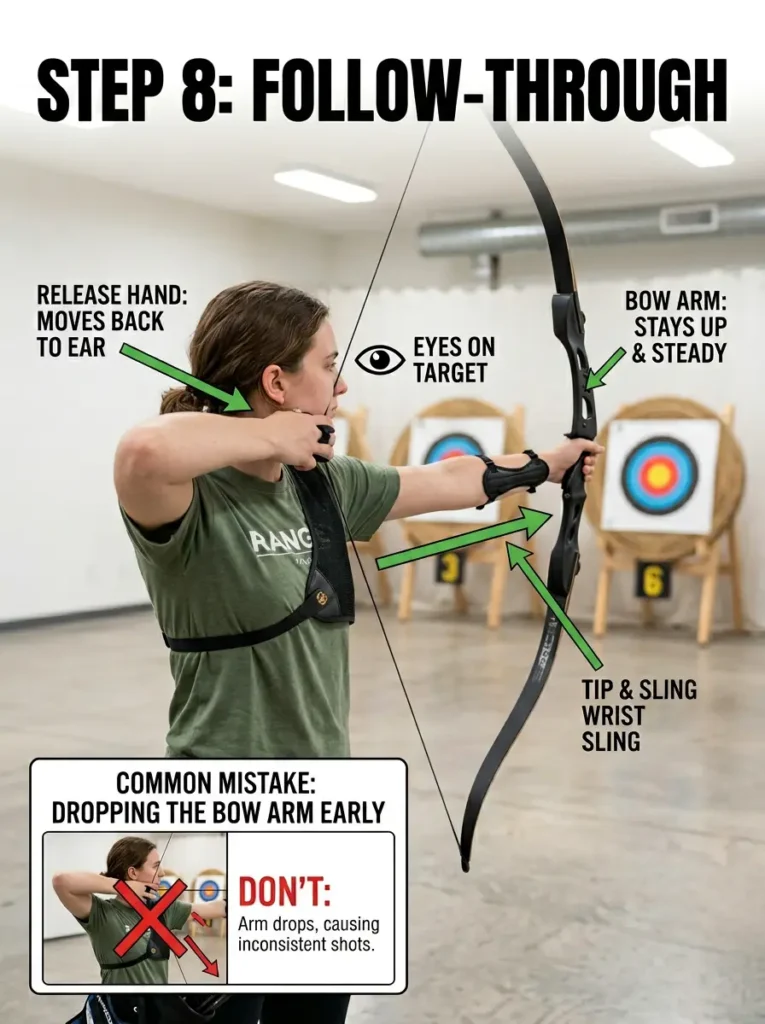
08 — Follow-Through
The shot isn’t over when the arrow leaves. What you do in the first half-second after release tells the whole story of your form.
- Keep your bow arm up and pointed at the target for 2+ seconds after release.
- Draw hand naturally travels to your ear or neck from the release tension — don’t force it.
- Do NOT drop the bow arm immediately — this is the #1 accuracy killer in beginners.
- “If you have correct form, proper follow-through is just going to happen.” (Field & Stream)
- Watch the arrow hit the target through your sight — this tells you if your form broke down.
Stance — Open at 45°
Stand with feet shoulder-width apart, body angled 45° toward the target. Beginners naturally stand at 90° — this closes the hips and creates torque on the draw. Open your stance to open your shot cycle.
Grip — Relax Everything
The bow grip is the most underrated fundamental. A tight grip creates torque on the riser that throws arrows left or right unpredictably. Pressure lives in the thumb pad — fingers stay loose.
Draw — Use Your Back
Beginners arm-muscle their draws. Experienced archers draw with their rhomboids and rear deltoids — the large back muscles that create sustainable, repeatable power.
Anchor Point — Be Robotic
Your anchor point is a cluster of 4–5 contact points that must be identical on every shot. Even 1mm of variation at the anchor translates to inches of error at distance.
Aim — Float the Pin
No archer holds their pin perfectly still. The goal is not stillness — it’s centering your focus on the target while letting the pin drift naturally inside a small zone.
Release — Trigger or Surprise
Two valid methods exist. Both require back tension loaded at the moment of release. What kills accuracy is jerking or flinching — the anticipation of the shot.
Follow-Through — Hold It
Your bow arm stays up. Your eyes stay on the target. Your body stays still for 2+ seconds after the arrow fires. This is the discipline that separates consistent archers from sprinters.
Evaluate & Reset
After every shot, do a mental replay. Where did your pin float? Did the bow jump at release? Where did the arrow hit vs where you aimed? This feedback loop is how you improve.
Draw Length Calculator
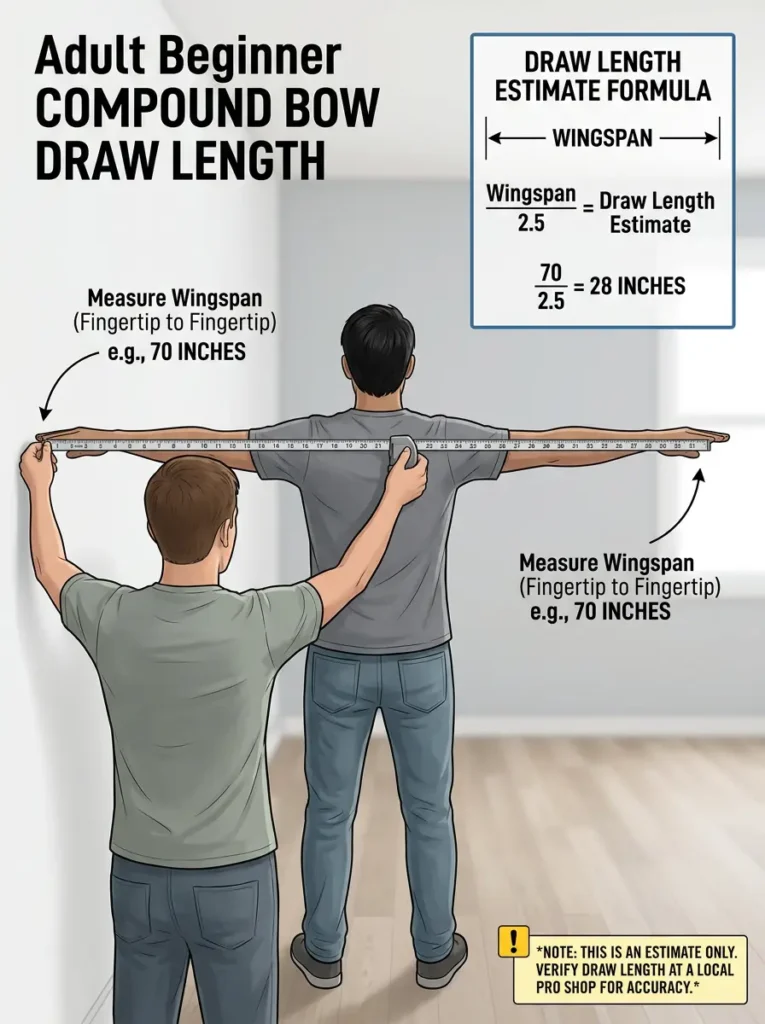
Your draw length is your most critical measurement. Get it wrong and every other part of your shot cycle suffers. Calculate yours in 10 seconds.
Find Your Draw Length
Stand against a wall with both arms outstretched. Have someone measure fingertip to fingertip (your wingspan). Divide by 2.5.
Always verify with an archery pro or shop. Draw length can be adjusted ±1″ depending on shooting style and anchor point preference.
Anchor Point Reference Map
You need ALL of these contact points simultaneously. Missing even one creates shot-to-shot variation you can’t diagnose or fix.
String to Nose
The bowstring gently touches the tip of your nose at full draw. This is a vertical anchor reference.
String to Lips
String contacts the corner of your mouth or chin, providing a horizontal anchor reference.
Peep Aligned
You see a perfect circle through the peep sight, centered around your sight aperture.
Release Hand to Jaw
Your release hand is firmly in contact with your jaw, cheekbone, or neck — consistent every time.
Back Muscles Loaded
Your rhomboids and rear deltoids are engaged — not just your arms. You feel tension across your upper back.
Front Shoulder Down
Your bow arm shoulder stays low and relaxed — not raised or hunched into the draw. Hinging not muscling.
Release Methods Compared
There are three release styles. Each has a specific use case. Don’t let anyone tell you one is universally “wrong” — context matters.
Command Style
You consciously pull the trigger when the sight picture is right. Most common among hunters. Fast, reliable, and easy to learn. Critics call it “punching the trigger” — but pros like Tim Ghillingham win major competitions this way. Best for: bowhunting, beginning archers, anyone under time pressure.
Surprise Release
You load your back muscles continuously through the shot. The hinge release fires when the back tension reaches a set point — it truly comes as a surprise. Eliminates target panic entirely. Best for: competitive target archers, anyone suffering from trigger panic, advanced shooters wanting ultimate consistency.
Thumb Button Release
A hybrid — you fire with your thumb rather than index finger. Gives more control than index trigger while allowing a calmer grip. Levi Morgan uses a Carter thumb release with his signature floating pin technique. Best for: intermediate to advanced archers, 3D competition, transitioning away from index releases.
“The vast majority of competition 3D shooters use a surprise release of some sort — holding the pin on target while tripping the mechanical release so slowly that the shot comes as a surprise. This is just like a rifle shooter slowly squeezing the trigger.”
— Field & Stream, How to Shoot a Compound Bow7 Beginner Mistakes — Fixed
These are the mistakes that keep 90% of new archers stuck. Each one has a specific, actionable fix.
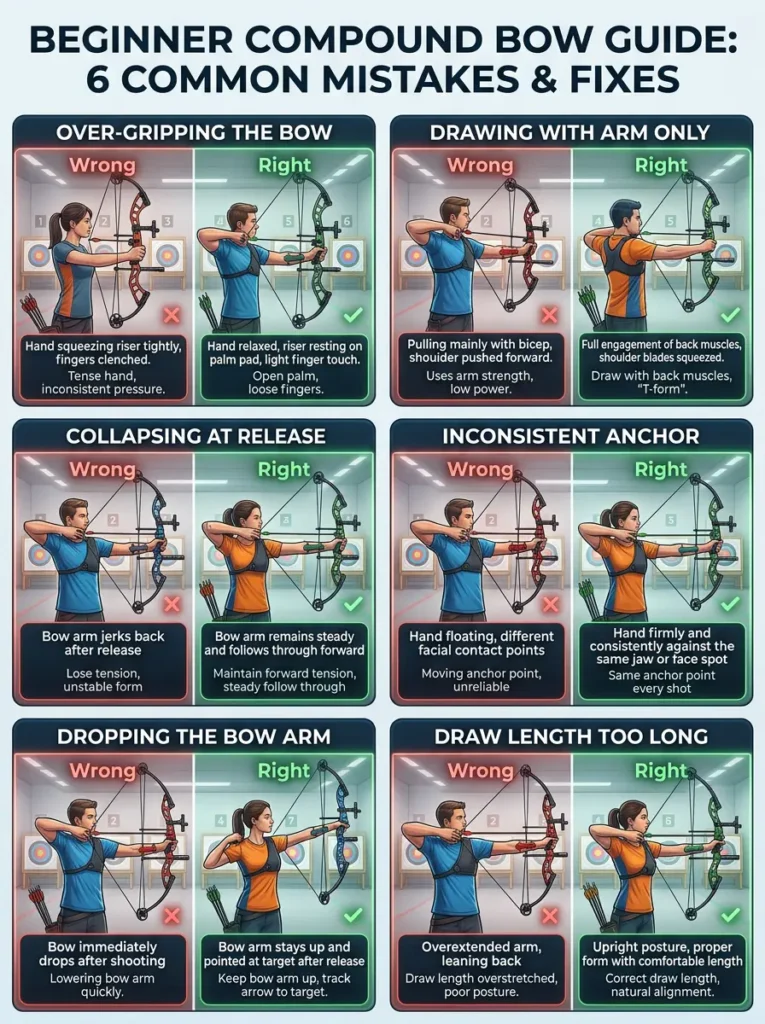
Draw Length Too Long
Standing at full draw looks like you’re leaning back, string arm hyperextended, back shoulder flying up. Shoulder injury follows eventually. Fix: measure wingspan ÷ 2.5. Have a pro adjust the cam or module to dial it in.
Correct Draw Length
At full draw, your front arm has a slight natural bend (not locked), back shoulder is level with front, and peep sight aligns comfortably without straining your neck. The bow feels like an extension of your body.
Death-Grip on the Bow
Squeezing the handle torques the riser. Every shot goes left or right inconsistently (for right-handed shooters, a tight grip typically pushes arrows left). Impossible to diagnose without recognizing the root cause.
Thumb Pad Pressure Only
Pressure sits only on the meaty pad of your thumb (thenar eminence). Fingers are loose — almost open. Use a wrist sling so you never fear dropping the bow. After the shot, the bow rocks forward naturally.
Dropping Bow Arm on Release
The bow drops immediately after the shot — a conditioned anticipatory flinch. You THINK the arrow has left before it actually has. This is caused by the brain predicting the shot rather than reacting to it.
Blank Bale Drill
Practice at point-blank range (3–5 feet) with eyes closed. No target, no aiming pressure. Focus only on back tension and holding the bow arm in position for 3 seconds after each shot. This rebuilds follow-through as a reflex.
Target Panic
The trigger fires involuntarily the instant the pin touches the target. Groups widen dramatically. Archers try harder to control it — which makes it worse. It’s a conditioned neurological response, not a willpower problem.
Switch to Back Tension
Use a hinge release (Carter Chocolate Milk is standard) and commit to pure back tension shots for 4–6 weeks. Start blank bale. Graduate to a target but aim at a spot you deliberately DON’T want to hit. This breaks the trigger-panic conditioning loop.
Inconsistent Anchor Point
Your groups are scattered — not in one direction, but randomly. You’re hitting well one day, struggling the next. The root cause is almost always anchor point variation from shot to shot.
Peep Sight + Multiple References
Install a properly sized peep sight. Practice finding all 4+ anchor contact points simultaneously — string to nose, string to lips, release hand to jaw, and peep centered — every single shot. Use a training mirror to verify your anchor visually.
Arming the Draw
Drawing with the arm (bicep, shoulder) instead of back muscles. Creates fatigue after 10–15 arrows. Also causes the front shoulder to rise, destabilizing the shot and creating inconsistent form throughout a session.
Elbow-Pull Drill
Think of your draw arm elbow as the pulling point — not your hand. Drive the elbow straight back behind you. Feel your shoulder blade move inward and down. This activates the correct back muscles. Drop weight if you can’t do this smoothly.
5 Accuracy Drills
These aren’t made-up exercises. Every one of these drills is used by professional archers including Levi Morgan’s training methodology and Nock On Archery’s Bowfit program.
// What Most Affects Beginner Accuracy — Impact %
| Technique Element | Impact on Accuracy | Time to Fix |
|---|---|---|
| Anchor Point Consistency | 2–4 weeks | |
| Release Consistency | 4–8 weeks | |
| Follow-Through | 1–2 weeks | |
| Bow Grip Torque | 1–3 weeks | |
| Stance / Alignment | 1 week | |
| Equipment Setup | One-time pro setup |
Impact estimates based on coaching experience and Field & Stream / Nock On Archery training methodology. Percentages represent relative contribution to shot-to-shot accuracy variance for beginners.
Blank Bale — Eyes Closed
Stand 3–5 feet from a target. Nock an arrow. Draw, anchor, and execute the shot with your eyes completely closed. No aiming. Focus entirely on the feel of your back tension and the position of your body.
After each shot, note where your bow arm is pointing and where your release hand has traveled. These positions tell you everything about your form.
Mirror Anchor Check
Stand in front of a full-length mirror. Draw to anchor at a 90° angle to the mirror so you can see your profile. Check that all 4 anchor contact points are established simultaneously: nose, lips, jaw, and peep alignment.
Hold at full draw for 3 seconds, then let down WITHOUT shooting. Repeat 15–20 times per session.
Floating Pin — Levi Morgan Method
Set up at 20 yards on a large target. Draw to anchor and deliberately let the pin float freely over the target face. Do NOT try to hold it still. Focus your eyes hard on the center X and let the shot fire via back tension when the pin is in the center zone.
This trains your brain to accept natural bow movement and stop chasing a still pin — which causes freezing and target panic.
Wrist Sling Grip Reset
Attach a wrist sling to your bow. Then deliberately open your bow hand fingers as you draw — fully extended, touching nothing but the thumb pad. Execute your entire shot sequence with an open hand. The sling catches the bow.
This drill eliminates grip torque completely and teaches your hand the correct contact points through forced muscle memory. After 200 arrows this way, your normal grip becomes automatically lighter.
3-Shot Group Tracking
Shoot 3 arrows per end at 20 yards. Measure the group size (tip-to-tip of the two outermost arrows). Log it. Your goal is to consistently shoot groups under 4″ before moving to 30 yards, and under 6″ before hunting distances.
Group tracking removes ego from practice. A scattershot 30-yard session means nothing. A tight 20-yard group means your fundamentals are ready to scale.
// Reference Videos from YouTube Experts
These videos from top archery coaches cover the techniques discussed in this guide. Images sourced from Nock On Archery and Bear Archery’s official YouTube channels.
⬆ Click any thumbnail to search for the video on YouTube. Images are illustrative representations, not actual thumbnails.
Pre-Shot Form Checklist
Run through this mental checklist before every shot during the first 3 months. Check each item as you work through it. This becomes automatic with repetition.
Shot Execution Checklist
Click each item as you verify it. Track your completion rate across sessions.
Your First 6-Week Plan
Based on Field & Stream’s proven beginner protocol, refined with Nock On Archery’s form fundamentals.
Foundation Only
7–10 yards. Blank bale. Eyes closed drills only. 20 arrows per session. Focus: anchor consistency, grip feel, back tension. No target face — remove the pressure to aim.
Eyes Open, Target
15–20 yards. Add target face. Both eyes open. 30–40 arrows per session. Finish each session with 15 close-up eyes-closed shots. Focus: floating pin technique, follow-through hold.
Extend & Test
20–30 yards. Only extend if 20-yard groups are under 4″. Track group sizes. Introduce 3-shot scoring. If groups widen, step back and diagnose. Distance is earned, not rushed.
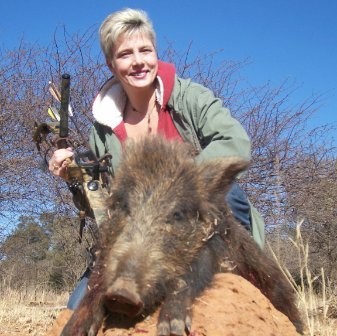
Charmaine van Vuuren is a seasoned professional hunter and safari guide turned outdoor gear expert, with over 15 years of experience leading big-game expeditions and wilderness adventures across Southern Africa. That same field-tested expertise now drives every review on TheOutdoorChamp — from hunting gear and survival tools to camping equipment, fishing tackle, and boating accessories. When she recommends a product, it’s because she’s used it in conditions where failure isn’t an option.


