Are you lucky to be inherited a binoculars from Dad?
Or you episode to gather in the warehouse an old binoculars musty but still runs well and want to restore and leave it to keep as a souvenir?

The following article will guide you refurbished so properly to remove grease, dirt and rust from old binoculars so you can make it clean, smooth and shiny again.
THE WRONG WAY TO CLEAN BINOCULAR
Let’s learn the right way to clean binoculars:
The Preliminaries
You are going to dismantle the binoculars, clean up the parts or components, and put them back together again.
To better remember what goes where, either note the position of various sections of the binoculars, memorize them or even just snap a photograph on your digital camera or mobile phone.
This will help you when it comes to re-assembling.
Here are some of the things you will need to bear in mind:
- The placement of washers, not to forget their shapes, sizes, diameters, and how they curve. Which way do they go as you turn them for removal?
- Where each screw is
- Look out for the tiny grub screws; these usually fasten adjusting rings on eyepieces. See where they are positioned relative to the body or eyepiece. This will help you re-find that position when putting the binoculars back together. This is especially important for right-hand eyepiece adjustments and diopter position shifts.
Some cleverly built binoculars hide their screws (a design feature) so there will not be reflective surfaces or simply just to make the binoculars seem aesthetic.
If you have overlooked these screws, no worries, take your time to make note of where they are before you unscrew them.

Workspace
Needless to say, a clean working area with plenty of space is a good idea. Grease will be involved. To avoid getting it on the surface, spread newspapers over the desktop.
- Pure white sheets of paper – On which thick components can be placed and seen with ease on the worktable.
- Small steel or plastic cups or containers – in which screws and other small items can be placed during the cleaning process.
- Distance – cups and containers at arms length to avoid accidental trip-over.
Tools
- Washing liquid or soap water – to help with alcohol or grease residues
- Lint-free microfiber cloth – for optics cleaning
- Tweezers – to help handle grub screws
- Note and pen/pencil – to take down notes when taking a camera snapshot becomes irrelevant
- White spirits or turpentine – to dissolve grease; do not use acetone, they can dissolve some plastic or paint surfaces
- Cotton buds or Q-tips
- Tissue paper – to help wipe off grease with alcohol
- Isopropyl alcohol – to clean grease remainders – and distilled (not mineral or spring water) water – to clean soap residues
- Kitchen roll – for rough rubbing tasks
- Lithium grease (from a cycle repair shop or garage)
- Toothbrush – to clean dirt from screw threads.
Dismantling
Aside from a few differences, which you can personally observe during this process, all binoculars share a common design template, so you should find this stage relatively straightforward.
- Use a soft cloth and soap water to give the outside of your binoculars a good clean. This is especially important for binoculars that are extremely dirty. This way you prevent dust or dirt from getting inside your binoculars when you open them up.
- The top of the binoculars, where you view through the lenses, will have a degree marker (or degrees of angle) on it with a screw holding it in place. Remove this screw.
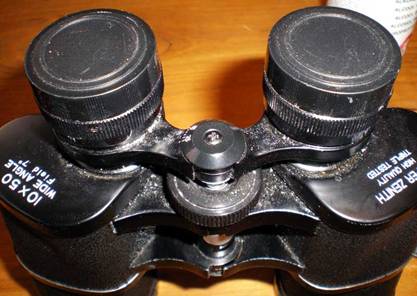
- There will be a brass eyepiece bush screw keeping the eyepieces together. This goes into an aluminium thread that, if rusted or oxidised, could prove tough. Jiggle the screw gently and you can get past this step.

- By this time, you must understand that force is not good. It will only damage the binoculars you are working to clean up and salvage. If you happen to come across a component that proves stubborn, see if you are doing it right or if it really cannot come off.
- With the bush screw out the way, you will see that the socket left open contains a powdery residue. This is aluminium oxide formed over time. Take a cotton bud, dip it in some alcohol and clean the thread zone. After that, take a small amount of grease with another Q-tip and apply inside the thread zone.

- Also, now that the brass screw is taken out, the right-hand eyepiece arm can be lifted away from the binoculars. There could be brass washers under the eyepiece; remove, note position, and place in a cup. The left eyepiece can then be removed, leaving the ocular prisms open for inspection.

Inspection & Cleaning
Probably because the prisms are inside the binoculars, you might have nothing to clean.
If you do find any dust and such in there, compressed air or a puffer bulb will help blow it out.
You can blow it out yourself but be careful you do not cast spittle by mistake. Practice on a mirror if you have to; do not trumpet-shape your lips when you blow.
Use cotton buds and some alcohol to clean stubborn dust residues. Lift, do not brush; as mentioned above, dust can scratch the prisms.
- You have now exposed the ocular optics region. Make sure you do not accidentally drop or leave behind grease, dust, alcohol, tissue fibres, and so on inside these areas or on the prisms themselves.
- Too much old grease can get tacky and cause scraping sounds as the eyepieces move through and fro. Take cotton buds dipped in very little turpentine or white spirits to the inner walls of the eyepiece tube. Placing the binoculars flat will help.
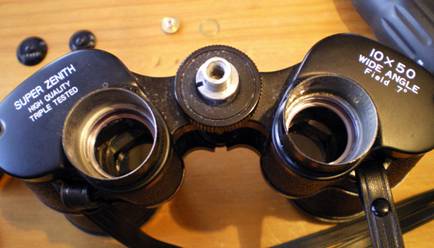
- Grip the cotton bud firmly, use a rotating motion to clean the insides of both the right and left ocular tubes. Do this until all the grease stains are gone.
- Take another cotton bud, dip it in isopropyl alcohol and repeat the same step as earlier.
- Finally, some tissue and alcohol can be used to wipe and shine the inner tubing. You can apply the same process to the tube’s outer walls where similar grease residues could be present.
Separation Into Halves
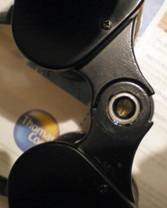
There will be a pivot axis screw (the centre cross-head screw comes first and then the pivot axis one) on the bottom of the binoculars. Remove this screw.
You will need a wide flat-blade screwdriver to help. If the screwdriver’s blade is too narrow, you might dent the channel edges while undoing and retightening, so get a wide one.


- There could be a washer under this, like thin brass packing washers between the pivot axis sections. Make notes of their positions before removing.
- Some of these old binoculars might have a screw holding the focus adjuster mechanism to the body of the pivot axis. Do not remove this yet; wait until the body is dismantled first.
Focuser Mechanism – Cleaning
Now that the pivot axis screw is out, its corresponding cylinder can be removed from the binocular frame. This separates the left and right ocular segments. You can also remove the brass packing washers from the focuser shaft. You might need to rotate the frames around the cylinder to make removal easy.

Take apart the focuser mechanism…
- You will find small quantities of grease. Clean it up.
- Fine aluminium powder filings add to the dust-burden. Clean these up too.
- You can be more thorough with the cleaning process seeing as how this is metal and not the ocular chambers you accessed before.
- Use a toothbrush dipped in white spirits to clean the focuser’s helical thread.
- Interchange and use the following as needed: tissue dipped in alcohol, kitchen cloth dipped in spirits, hot soap water.
- Reapply new grease (use Q-tip) after drying the parts, in this case Lithium grease. Be liberal with this, it increases focuser smoothness and resistance to action. Apply said grease to the fastening screw threads as well.
- Reassemble the focuser unit.

Focuser Mechanism – Keying
This is a quick middle-step. Check out the photograph below…

- Notice the focuser mechanism has a slot. This connects to a raised pin in the main ocular framework.
- This pin does not let the outer focuser shaft move when attached to the main body.
- The rotating of the black ridged focuser knob encourages the central shaft to move in or out of the focuser. This is how the eyepieces can even focus.
- The slot therefore has to link aptly with the keying feature when you start re-assembling the binoculars.
Left-Hand Eyepiece – Cleaning
Taking each eyepiece apart makes de-greasing easier, not to mention spirit, alcohol and soap water cleaning; in that order. Use the photograph below for reference…

- The metal frame and the eyepiece cup have been separated.
- The eyepiece lens cylinder (middle piece) can be removed next.
- When it comes to the lens itself, be gentle and apply minimal cleaning methods. Any dissolved grease, alcohol or water that might escape into the gaps around the lens can result in staining, marking or condensation; avoid these no matter what.
- In case you make a mistake there is a specialized tool to help you remove the lens-retaining ring by unscrewing it. You can then clean and dry the lens glass.
- Use Q-tips and a little grease, apply as needed to the eyepiece lens cylinder’s outer wall where it locks into the main frame. Do the same to the threaded section where the eyepiece cup screws on.
Right-Hand Eyepiece – Cleaning
This has its own focusing mechanism and Diopter Scale.
Important Note: When you set the Diopter Scale on its centre-mark, both left- and right-hand eyepiece cups should have level tops. This is why you need to make note of the relative positions of the eyepiece cup and Diopter scale to that of the Focuser.

- There will be three grub screws to remove. These hold the cup to the focuser’s rotating threaded portion.
- It will take a while to reassemble this part because, as mentioned in the note above, you will need to have precise Diopter scale positioning in relation to the focuser, using the centre-mark to help. The focuser has to be adjusted to the same degree as the other eyepiece, namely the left-hand one.
- Perform the same cleaning and reassembly methods as you did for the left-hand eyepiece. Go easy when re-greasing the outer surfaces of the lens unit and the screw threads. Use more grease only for the focuser thread so it can move smoothly; keep the amount moderate, though, else grease can squeeze out the focuser when used.
- Here is how the right-hand lens components look when it is all cleaned up…

Re-Assembly & Final Touches
Put them all back together using your notes, memory, and any photos you might have taken to help with this stage. Use alcohol moistened cloth or tissue to give the binocular body a final wipe-polish; they might have gotten some grease on them during this whole process. Wash your hands after.
Here are some other things to do at this time…
- Make sure the packing washers find their original positions.
- The screw threads need a light re-greasing.
- When reassembling both halves, untwist the neck strap or you will end up with unattractive curls on them.
- Do not over tighten screws nor leave them too loose. Old binoculars mean old metal screws that could have developed a bad case of ‘metal fatigue’, in which case they might break upon over tightening; save time and expenses by going steady at this screwing stage.

And now, it is a good binoculars for hunting or binoculars for birding!


